Are you one of those customers discerned by Microsoft Azure for Self-service deployment functionality? Firstly, it’s a great feature to take of edge off the deployment process, please click here to know more of this functionality, and at the same time, here is what you should know the implications of it.
-

-

As we get used to news ways of working during these unprecedented times with lot of Microsoft Teams, Google meets, Zoom meetings and what not to all that supports us to work remotely, I would like to say big thanks to all virtual technologies for keeping us busy during this time
There is a saying that “revenue is vanity, profit is sanity, but cash is reality. I wanted to share a knowledge on cash flow forecasting in D365 for Finance. This feature is available since AX 2012 but it less likely used by customers. I would recommend using this feature to have visibility of future cash in the business based on the current events.
In D365 for Finance, this feature can be now configured from one central place to integrate with General ledger, Accounts payable, Accounts receivable, Budgeting and inventory management.
Cash and bank account management > Cash flow forecasting > Cash flow forecasting setup
General ledger:
In the general ledger tab, specify all the liquidity accounts (Cash or cash equivalent) which should be tracked for cash flow forecasting.
Additionally, the dependencies can also be setup between accounts for cash flow forecasting. This would be a relationship where the forecast for one account is based on the expected activity in another account.
This is for transactions which will not have either orders or invoices. For Eg: A liquidity account for an expected sales taxes payment can be configured. The main account is primary account or a liquidity account which is expected to be impacted by sales tax payables account, you can also setup percentage of allocation.
 Accounts payable and Accounts receivable:
In the accounts payable and accounts receivable tabs, setup the typical purchasing and sales behavior to be used for cash flow forecasting, let me explain each default option and how it effects the cash flow forecasting
Time between delivery date\Shipping date and Invoice date: Setup a payment term which indicates the estimated time taken to invoice an order after the delivery\shipping of goods or services.
Terms of payment: Setup a payment term which indicates and describe the estimated time taken for the invoices to be due for payment as per the contract with vendors\customers. The forecast will use the default setting for the Terms of payment only if a value isn’t specified on the transaction.
Time between invoice due date and payment date(Previously known as settlement period): Setup a payment term which indicates the estimated time taken to receive or make the payment for the invoices which are past due
Liquidity account for payments: Setup a default liquidity account for AP\AR transactions
Percentage of amount to allocate for cash flow forecast (Optional): Setup an allocation key to describe the percentage of the transaction amount that should be used in the cash flow forecast.
Additionally, you can override the default values for Time between invoice due date and payment date (Previously known as settlement period) and Liquidity account by Vendor groups and Vendor posting profile respectively

Budgeting:
For budgets to be included in cash flow forecasting the budget models should be enabled with cash flow forecasting in Budgeting module
Once the budget model is selected to include in cash flow forecasts, the budget model will be automatically gets added to cash flow forecast setup form under budgeting tab. By default, new budget register entries are included in forecasts after the budget model has been enabled for cash flow forecasting. Inclusion in cash flow forecasting can be overwritten on individual budget register entries.
Budgeting > Setup > Basic Budgeting > Budget models

Inventory Management:
Demand and supply forecast models can also be tracked for cash flow forecasting. The forecast models can be selected to include in cash flow forecasting in forecast models which will be automatically added to cash flow forecast setup form under Inventory management tab. You can deselect the model if it’s not required.
Inventory management > Setup > Forecast > Forecast models

Calculation:
In the reporting tab, you can calculate cash flow data based on the options listed below.
Total: This option is used recalculate the complete cash flow data based on the configuration setup. Microsoft recommends using this option only if the cash flow data haven’t been updated from long time.
New: This option is used to calculate the cash flow data only for new transactions in the system
Note : You can also to setup a recurring batch process for cash flow forecast calculation.

Reporting:
In D365 for Finance, the cash flow forecasting is enabled with analytical reporting using Power BI. Unfortunately, I did not get a chance to explore analytical reporting yet. However, as soon as I get a chance will update this blog with sample analytical reporting
According to Microsoft
“There are two workspaces that contain cash flow forecasting data Cash overview – all companies and Cash overview – current company. The workspaces show an overview of cash flow forecasting and bank account balances. A chart of cash inflows and outflows gives an overview of future cash movements and balances in the accounting currency, together with detailed information about the forecasted transactions”
Additionally, you can view cash flow forecasting data for specific accounts, orders, and items. Click here to know more information. Here is an example of cash flow data from a Trial balance page:
This page will also show the Date (this means cash flow forecasted date based on defaults applied for typical behavior of business transactions), source of the data, document number, posting type and amount

As i write this blog, i recently caught sight of Microsoft road-map on Dynamics 365 Finance and it is indeed focused on cash flow forecasting with advanced analytics using AI models
Check out for more details:
Look forward to see this feature live soon!
#Stay home #Stay Safe
Best Regards,
Namith HosmaneReferences:
https://docs.microsoft.com/en-us/dynamics365/finance/cash-bank-management/cash-flow-forecasting
Disclaimer:
This is a personal blog. Any views or opinions represented in this blog are personal and belong solely to the blog owner and do not represent those of people, institutions or organizations that the owner may or may not be associated with in professional or personal capacity, unless explicitly stated. All content provided on this blog is for informational purposes only. This blog makes no representations as to the accuracy or completeness of any information on this site. -

As the world getting automated, AI enabled and using machine learning capabilities for complex business operations to make it easier and efficient. We often ignore to explore and advance some of the simple business operation by using existing technology.
In a finance process improvements initiative, we usually talk about automating the O2C, P2P processes but there are operations more like creating and posting same journal entries on daily, weekly and monthly basis which has become monotonous task for a finance persona.
In my previous blog on recurring journals, i discussed about automating the process using Power platform(MS flow). In this blog, I would like to discuss how we can use existing allocation rules functionality to automate the process of creating recurring journals more efficiently than using periodic journals, voucher templates in D365 finance application.
Configure ledger allocation rules (Fixed weight):
Configure ledger allocation rule with fixed value(source) and fixed weight method(destination) to create recurring journals, please follow the steps below
- General ledger > Allocations > Ledger allocation rules
- On the overview tab,
- On the Rule field, enter the unique name for recurring journal
- Enter the Effective date (Start date) and Expiration date (End date).
- Mark the Active check box

- On the general tab,
- Select the allocation method: Fixed weight
- Select the journal name (This should be pre created with journal type ‘Allocation’ under General ledger > Setup > Journals > Journal names)
- Select the Data source: Fixed value
- Enter the value for creating recurring journal for source account

- On the offset tab,
- Select the offset account which needs to be credited for your recurring entry
- Select the financial dimensions, if applicable

- On the action pane,
- Click on Destination and click new
- Enter the recurring value in the Fixed weight field
- Select the ledger and financial dimensions which needs to be debited for your recurring entry

Process allocation request:
After the ledger allocation rule is configured, process allocation request functionality can be executed to create the journals automatically.
- General ledger > Allocations > Process allocation requests
- On the dialog,
-
- Select the ledger allocation rule (configured above).
- Enter the GL posting date
- Enter the As of date (Same as GL posting date)
- Select the Proposal options,
- Proposal only: The journal will be created and is available for review and posting.
- Post only: The journal will be created and posted.

Review allocation journal:
Once you process allocation request, system will automatically create the allocation(recurring) journal based on the ledger allocation rule. Since I used the Proposal only option the journal will be available for review and post
- General ledger > Allocations > Allocation journals
- Select the journal created and click on lines
- Review the journal and post

Hope this helps.
Best regards,
Namith HosmaneDisclaimer:
This is a personal blog. Any views or opinions represented in this blog are personal and belong solely to the blog owner and do not represent those of people, institutions or organizations that the owner may or may not be associated with in professional or personal capacity, unless explicitly stated. All content provided on this blog is for informational purposes only. This blog makes no representations as to the accuracy or completeness of any information on this site. -

In my last blog post I discussed some of the organization purposes and its use in building effective organization framework. This blog will focus on the remaining hierarchy purposes and its usage within D365 for Finance.
Retail assortment:
This purpose is used in setting up assortments for various retail channels like brick and motor stores, online stores by grouping the retail stores through organization hierarchy instead of assigning the assortment individually to each store. The assortment can be assigned to the high-level organization node. Then, whenever a new retail channel is added to the high-level organization node, that retail channel automatically inherits any assortments that were assigned to the higher-level organization node. Only the organization hierarchy assigned to this purpose can be used to setup retail channels to the assortments.
Retail > Catalog and assortments > Assortments

Retail replenishment
This purpose is used to group the stores that are replenished through retail hierarchies. The groupings can be based on the organization, size, turnover, or type of the stores and then setup the specific replenishment rules to hierarchies assigned to the retail replenishment purposes. The retail channel included in the hierarchy can be used to define replenishment rules.
Retail > Replenishment > Replenishment rules

Retail reporting
This purpose is used in retail reporting such as channels sales by report, Top products report, Top customers report etc. based on organizational hierarchy which is configured with various retail channels and stores grouped together in an hierarchy.
Retail > Inquiries and reports > Sales reports

Retail POS posting:
This purpose is used to post inventory, calculate statement and post statements for the group of stores in a hierarchy when the batch job is defined. Only the associated organization hierarchy for this purpose can be used for retail postings.
Retail > Retail IT > POS posting

Benefit eligibility control
This purpose is used to define and exercise eligibility rules for each benefit that your organization offers to workers based on the organization hierarchy. Only the associated organization hierarchy for this purpose can be used in defining benefit policies in human resource module.
Human resource > Benefits > Eligibility

Budget planning
This purpose is used to define the budget planning process for the organization, a hierarchical relationship can exist between parent and associated budget plans. Different budgeting workflows can be defined by organizational unit in a budget planning process. Only the associated organization hierarchy for this purpose can be used in defining budget planning process in budgeting module.
Budgeting > Budget planning > Budget planning process

Project management
This purpose used to display projects by organization hierarchy from the All projects list page. There is a selection field ‘Legal entity’ in the All projects list page which provides the option for filtering by legal entities by default, if the organization hierarchy with this purpose is assigned, the lookup will be changed with the view by organization hierarchy
Project management and accounting > Projects > All projects

Premium earning policies:
This purpose is used to define the premium earning policies (US Payroll) to workers. The associated organization hierarchy for this purpose can be used in defining premium earning policies by organization hierarchy in Human resource module.
For this purpose, only the Legal entity organization type is allowed. However, the organization hierarchy here can be used to group legal entities and define policies.
Payroll > Setup > Earnings

You are all set to define right hierarchy purposes to the organization needs.
Please feel free to provide feedback or comments on this blog post.
Thank you!
Namith HosmaneDisclaimer:
This is a personal blog. Any views or opinions represented in this blog are personal and belong solely to the blog owner and do not represent those of people, institutions or organizations that the owner may or may not be associated with in professional or personal capacity, unless explicitly stated. All content provided on this blog is for informational purposes only. This blog makes no representations as to the accuracy or completeness of any information on this site. -

Planning organization hierarchy is a vital step for an ERP implementation to define how organization should be structured and controlled. Please read the article from Microsoft which demonstrated the best practices to plan organization hierarchy in D365 Finance.
Having said that, we often questioned what’s the use of organization hierarchy purposes and how it helps in building effective organization framework in D365 Finance. In this article, I will give brief idea about how each of these hierarchy purposes helps in building supportive organization framework.
There are about 17 out of box organization hierarchy purposes and the part 1 of this blog will discuss some of them,
Organization administration > Organizations > Organization hierarchy purposes
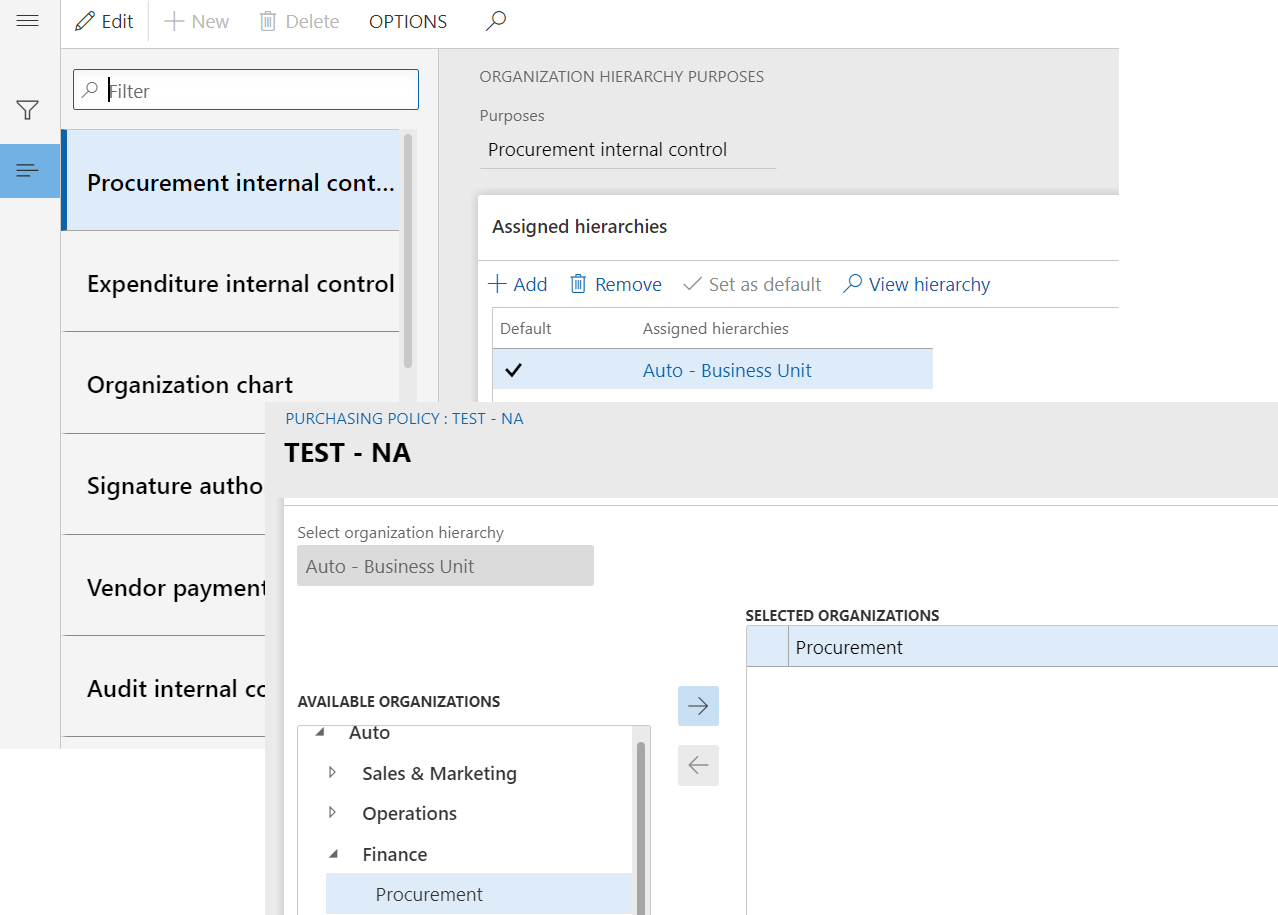
Procurement internal control
This purpose is used for purchasing policies that controls the requisition process based on organization hierarchy. Only the associated organization hierarchy for this purpose can be used in defining purchasing policies in procurement and sourcing module.
For example, the hierarchy will help if the organization requires different purchasing policies based on business units.
Procurement and sourcing > Setup > Policies > Purchasing policies
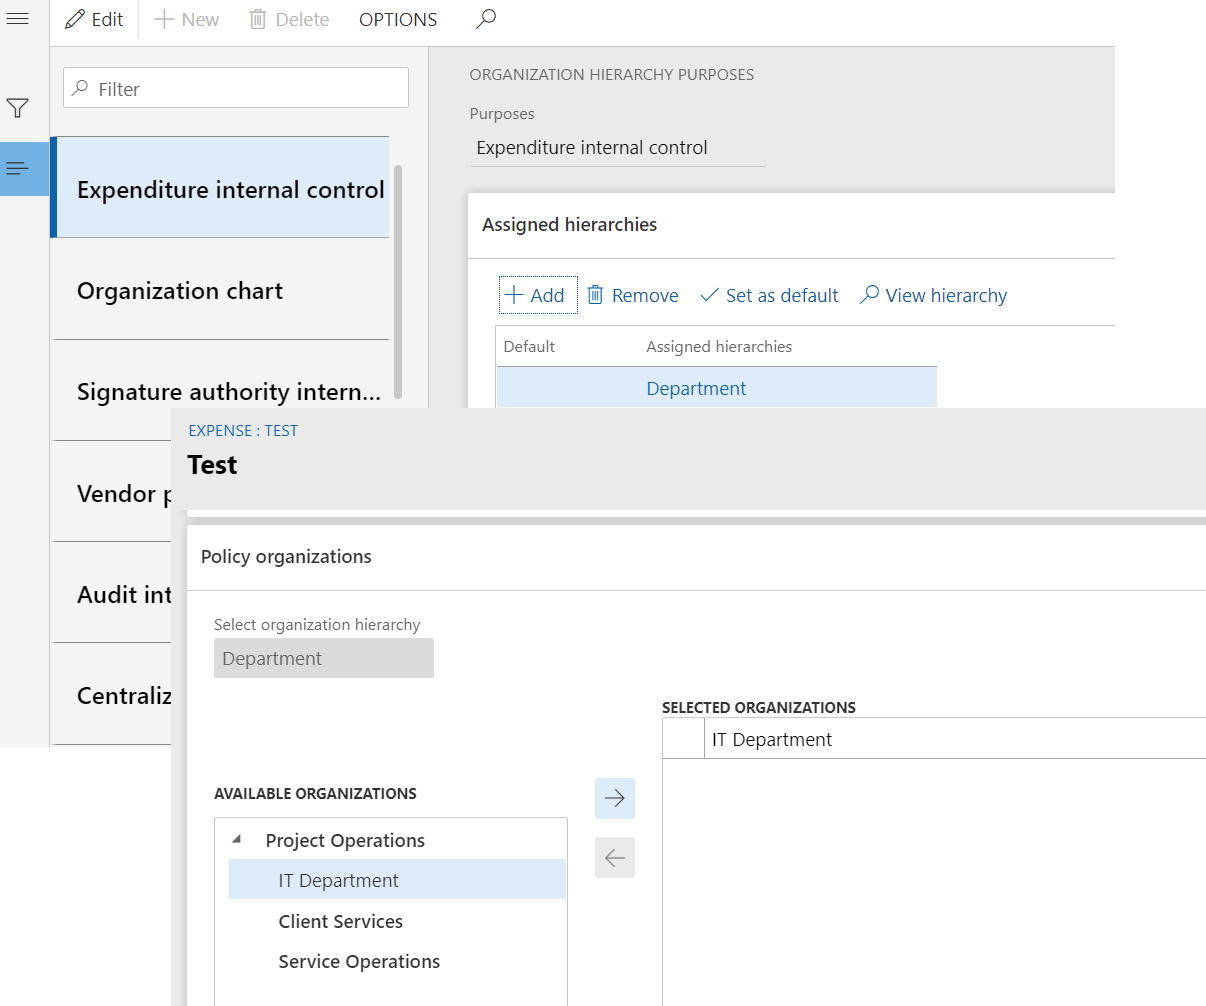
Expenditure internal control
This purpose is used to control expense report policies based on organization hierarchy, Only the associated organization hierarchy for this purpose can be used in defining expense policies in expense management module.
For example, the hierarchy will help if the organization requires different expense policies based on departments.
Expense management > Setup > Policies > Expense report
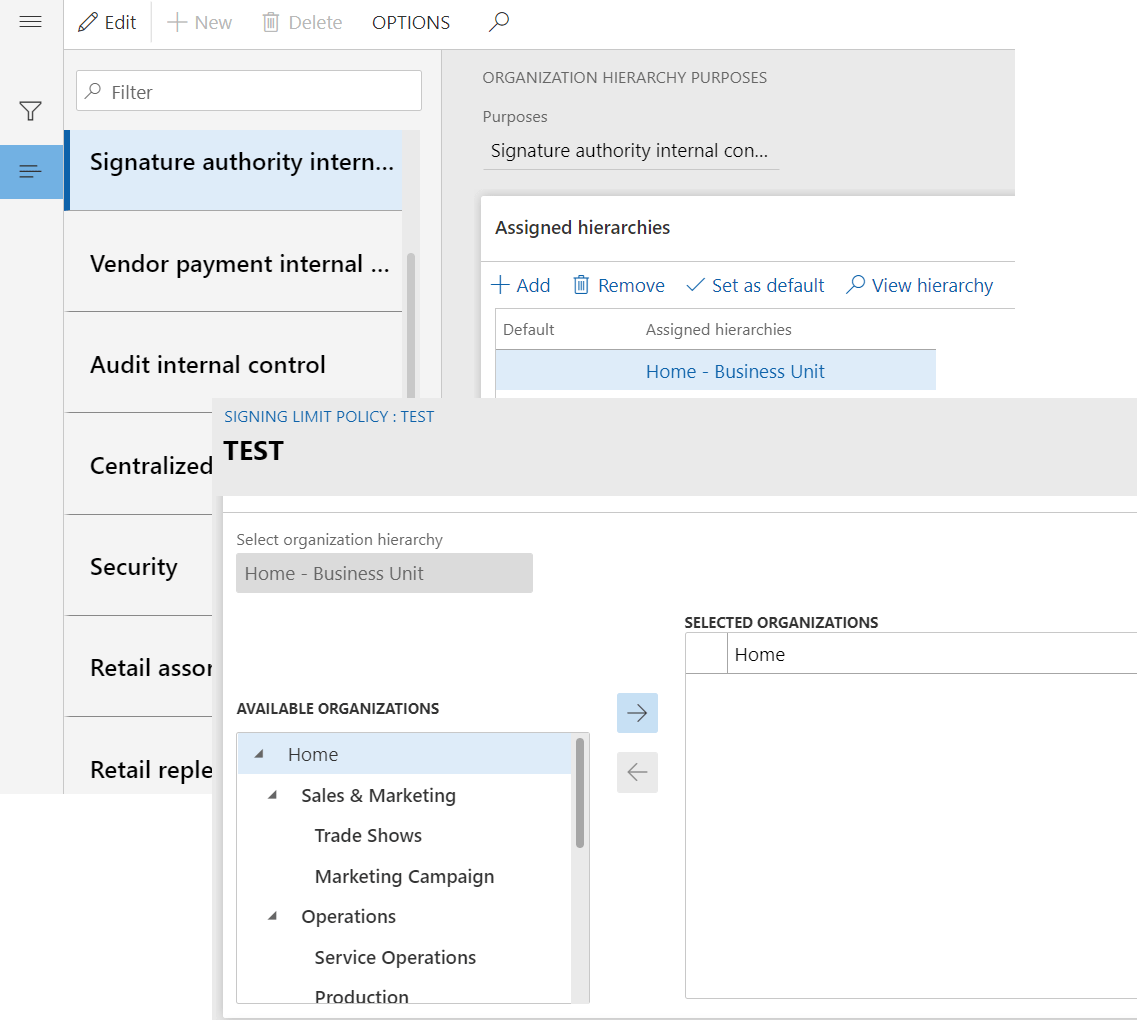
Signature authority internal control
This purpose is used for signing limit policies to control approval limits based on organization hierarchy on different business documents. Only the associated organization hierarchy for this purpose can be used in defining signing limit policies in organization administration module.
For example, the hierarchy will help if the organization requires different signing limit policies based on business units.
Organization administration > Setup > Signing limits > Signing limit policies
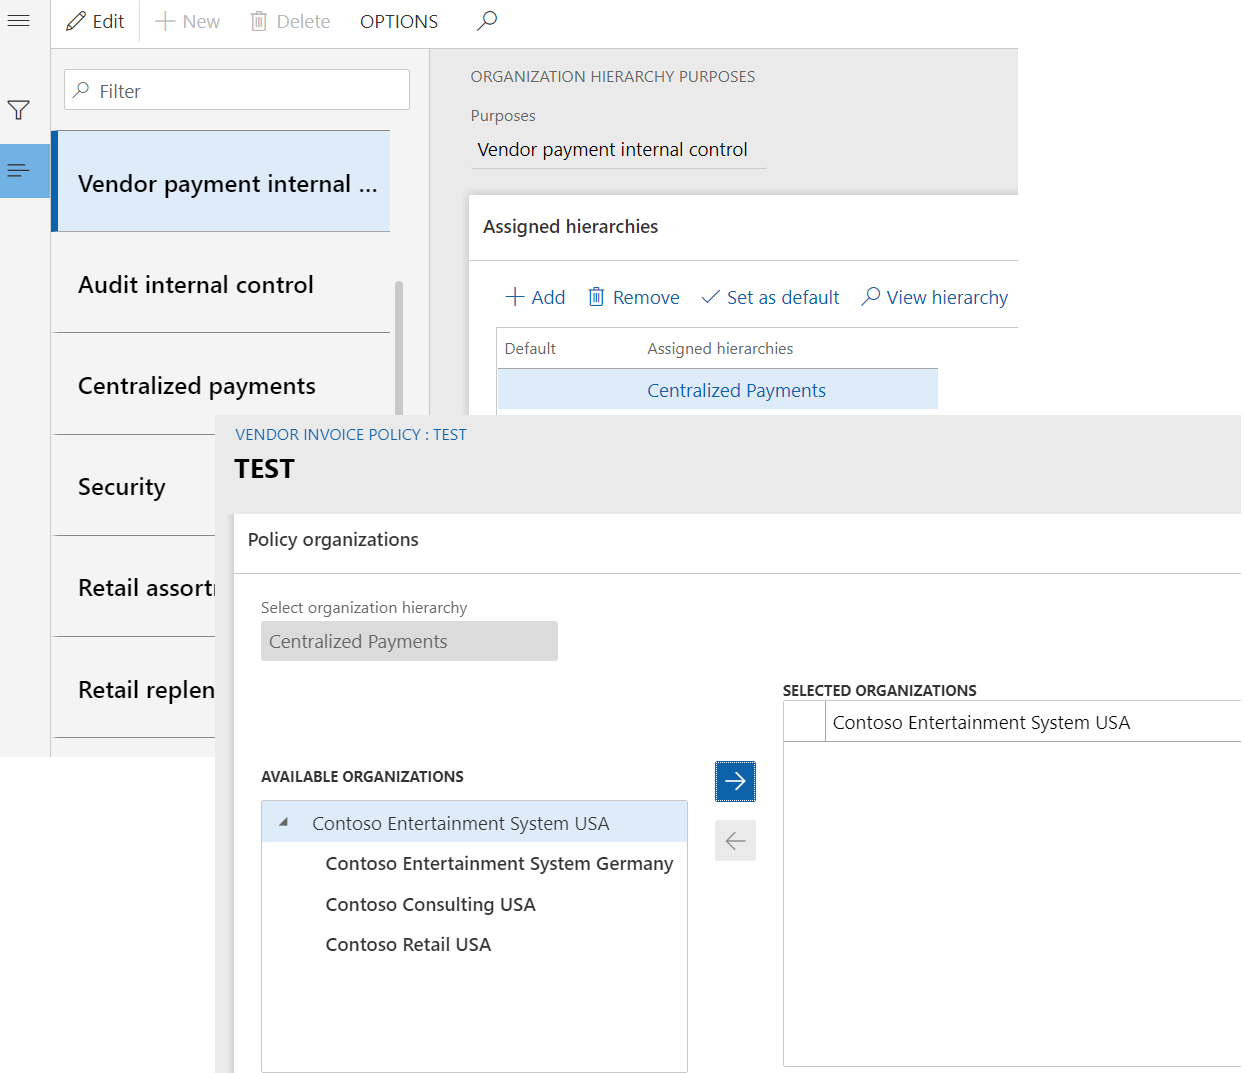
Vendor payment internal control
This purpose is used for vendor invoice policies to control and evaluate vendor invoicing process through predefined policy rules, Only the associated organization hierarchy for this purpose can be used in defining policies in accounts payable module.
For this purpose, only the Legal entity organization type is allowed. However, the organization hierarchy here can be used to group legal entities and define policies.
Accounts payable > Policy setup > Vendor invoice policies.
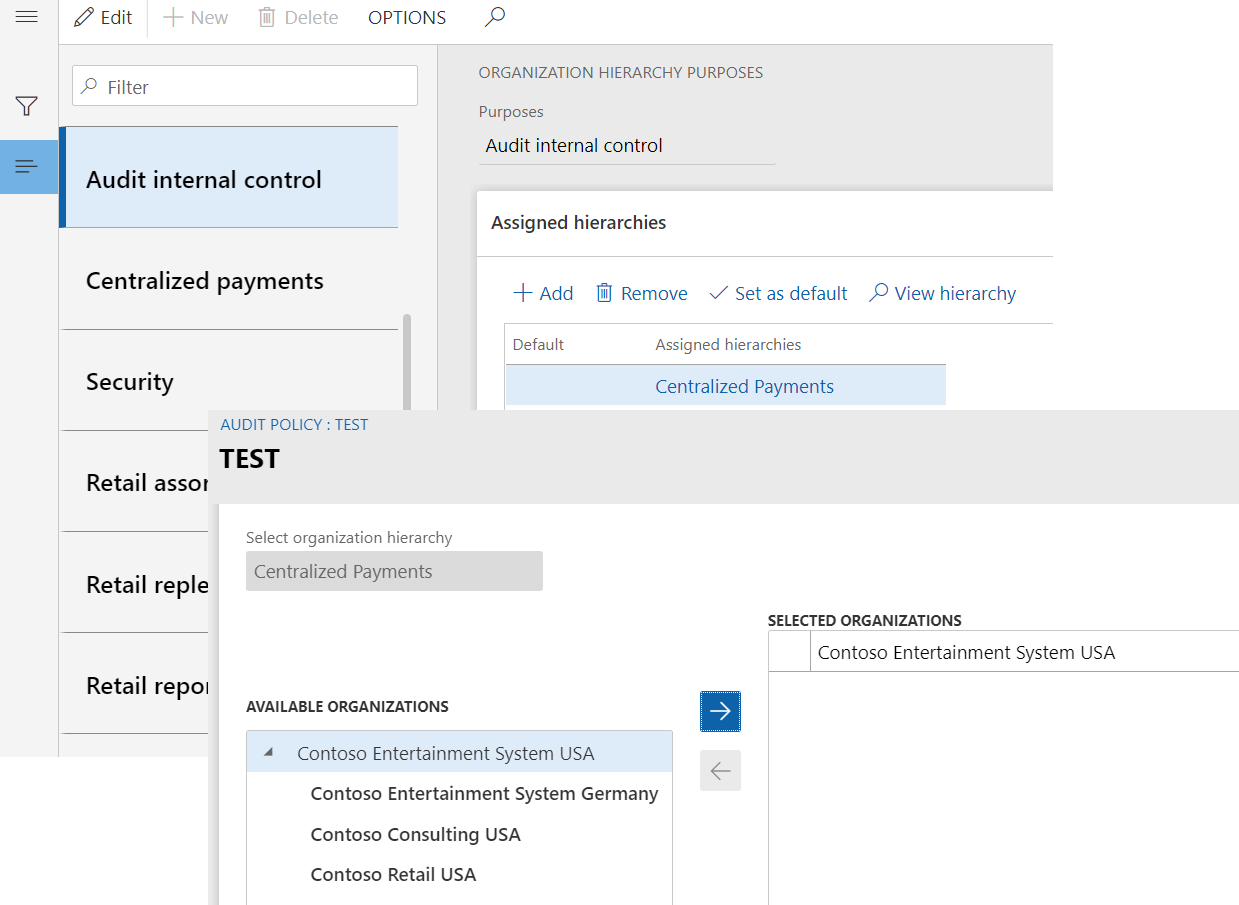
Audit internal control
This purpose is used to implement the compliance strategy policies for organization. Only the associated organization hierarchy for this purpose can be used in defining audit policies in Audit workbench module.
For this purpose, only the Legal entity organization type is allowed. However, the organization hierarchy here can be used to group legal entities and define policies.
Audit workbench > Setup > Audit policies
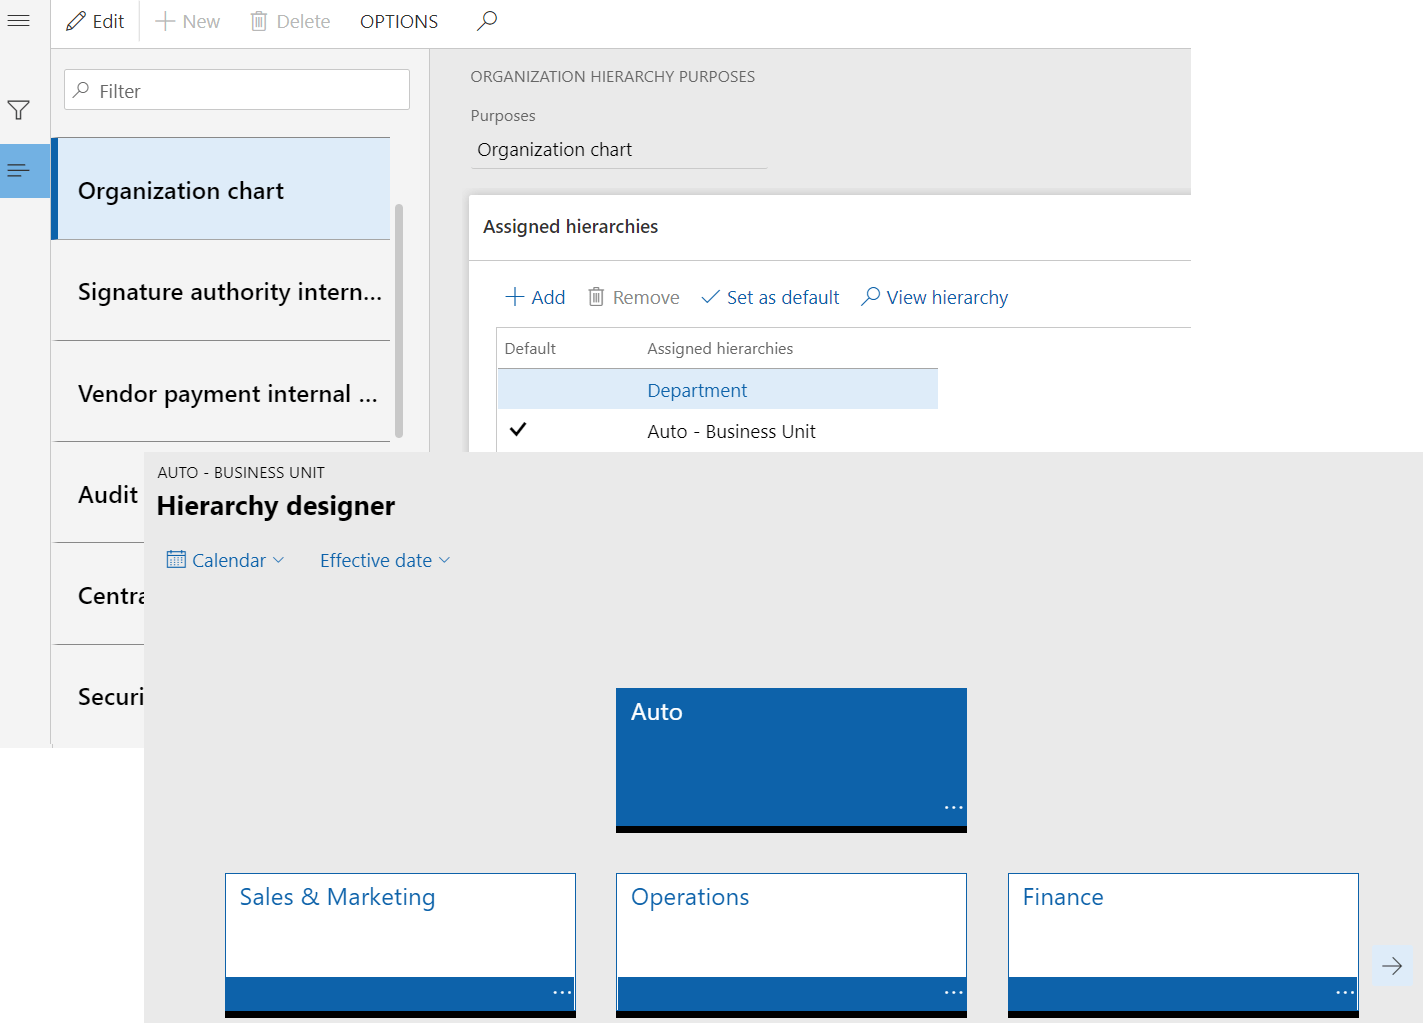
Organization chart
This purpose is mainly used in Human resource module to define relationship between departments, jobs and positions. The default hierarchy assigned to this purpose will be used as Department hierarchy in Human resource module.
Human resources > Departments > Department hierarchy
Centralized payments
This purpose is used to define the relation that can pre populate legal entities in payment proposal to process centralized payments. Otherwise, every legal entity must be manually selected to include transactions for centralized payment processing. This hierarchy purpose is applicable to both customer and vendor payments.
Please note the hierarchy only with Legal entity organization type is allowed for this purpose.
Accounts receivable > Payments > Customer payment journal
&
Accounts payable > Payments > Vendor payment journal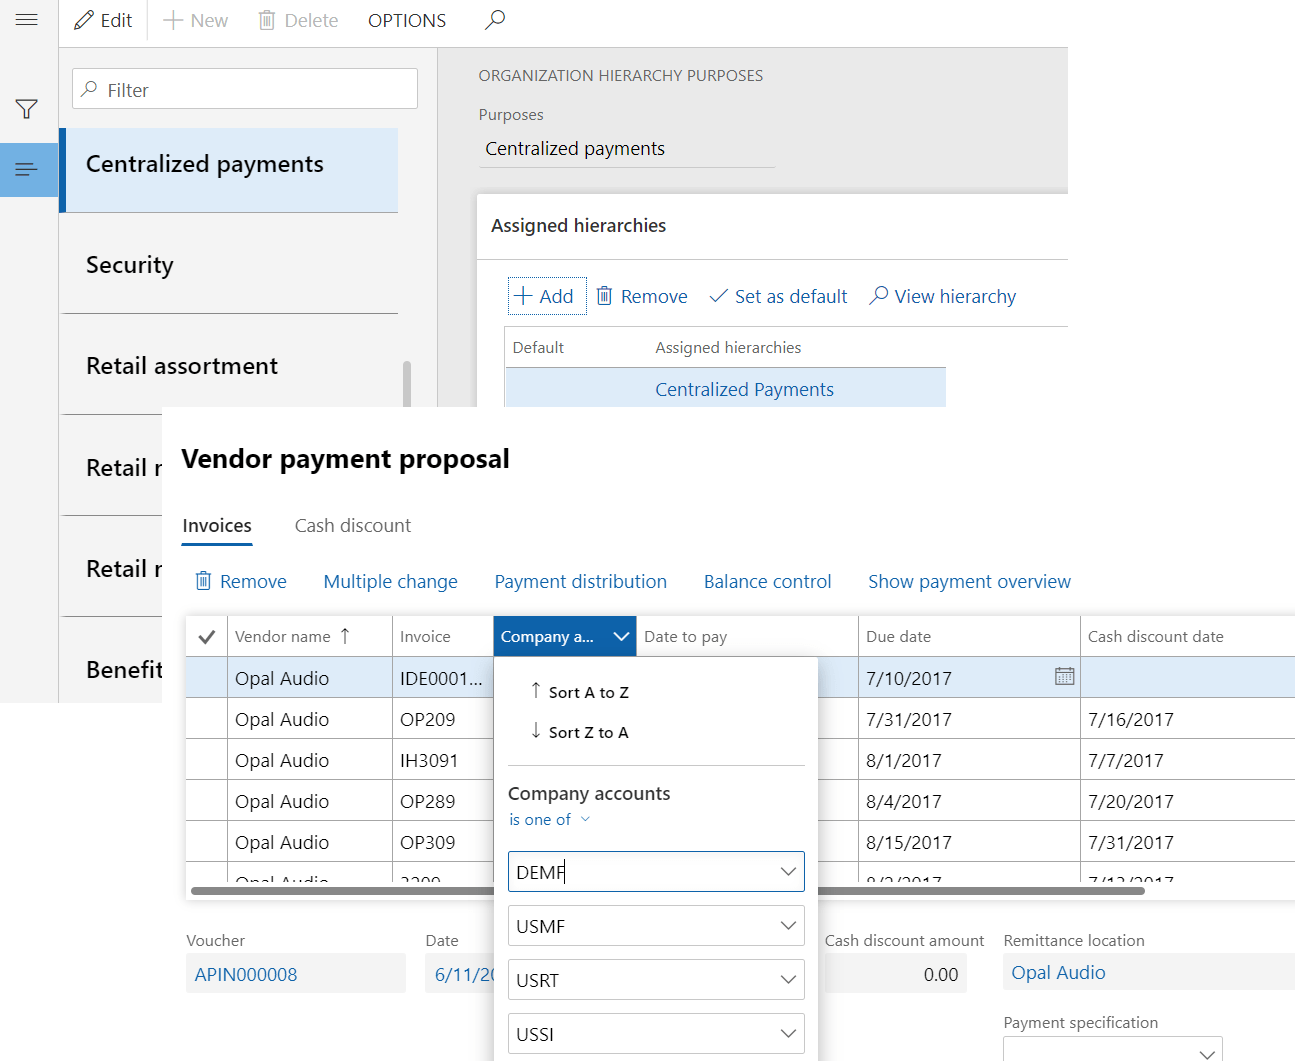
Security
This purpose is used to restrict user’s access to data based on the relationship to an organization. Only the hierarchy associated to this purpose can be used to define user relationship in system administration module. Also, this purpose is also used for budget planning to have budget plan preparers access to the budget plans if the security model selected as Based on security organizations.
System administrations > Users > Users > Assign organizations

Important note:
- The hierarchy need to be selected in required policy parameters first, it then helps define policies based on departments, business units etc…
- Same hierarchy can be used for different purposes if it suffices the organization framework requirement and control.
- If the business does not require complex internal control policies and data security access that are based on hierarchies. Simple policies and data security can be based on a list of legal entities that is not organized in a hierarchy.
Remaining part of the organization purpose will be explained in part 2 version in upcoming blog post.
Wish you all a very happy new year!!
Best Regards,
Namith HosmaneDisclaimer:
This is a personal blog. Any views or opinions represented in this blog are personal and belong solely to the blog owner and do not represent those of people, institutions or organizations that the owner may or may not be associated with in professional or personal capacity, unless explicitly stated. All content provided on this blog is for informational purposes only. This blog makes no representations as to the accuracy or completeness of any information on this site. -

Microsoft has been releasing some exciting features in all areas of business application, here are some of the accounts receivable features recently released for Microsoft Dynamics 365 Finance business app.
These are some of the small changes but has significant impact on accounts receivable day to day operations.
Show due date and allow edit
How important is to keep the aging and bad debt reserve calculation correct to reflect and present financial statements accurately in the month end, with complex AR operations subject to frequent change in the terms of payment with the customer that impacts the due date of invoice and aging calculations.
Microsoft has released this new feature to fill this gap which will allow to edit the posted customer transactions to change the due dates in the system. Please see below
Accounts receivable > Setup > Accounts receivable parameters
On the settlement tab, options fast tab
Mark ‘Show due date and allow edit’My recommendation if you are turning on this feature, to update all existing transactions and keep it consistent. If you have large set of transactions run the process in background.

Once the feature is enabled, go to customer transaction form and select the transaction to which due date need to be changed.
Click on edit and click on the Due date hyperlink to update the due dates and cash discount dates.

Verify the due date on the customer transaction line is updated from 09/01/2019 to 12/22/2019

Free text invoice template
We all know how templates help to perform day to day business operations faster and easier.
D365 finance had free text invoice template feature from earlier versions. However, this new feature will provide the ability to save any free text invoice record as template and use them for recurring invoices. Also, create a new free text invoice using a template when its manually created.
Accounts receivable > Invoices > All free text invoices.
Select the invoice from which the template needs to be created.
On the Invoice tab, click on Save to template
Enter template name and description
Click ok to save the template
To create new FTI from template, click on New from template
Select the template just created and a customer account.Select either FTI template or customer account to determine the default values like terms of payment, methods of payment, financial dimensions etc…
Copy free text invoice lines
How often we spend time to add FTI lines with similar line details, this new feature from D365 finance provide an ability to copy FTI lines in the same free text invoice record.
Accounts receivable > Invoices > All free text invoices.
Click on the invoice to which invoice lines to be copied
On the invoice lines, click on ‘Copy selected lines’
Enter the number of copies per each selected line is required and copy notes, attachments and distributions if required.
As we see the similar 10 lines are copied to FTI invoice record quick and easy.

Best Regards,
Namith Hosmane
Disclaimer:
This is a personal blog. Any views or opinions represented in this blog are personal and belong solely to the blog owner and do not represent those of people, institutions or organizations that the owner may or may not be associated with in professional or personal capacity, unless explicitly stated. All content provided on this blog is for informational purposes only. This blog makes no representations as to the accuracy or completeness of any information on this site. -
Microsoft has been releasing some good features for D365 F&O application in the recent past. Copy customers and vendors is one such feature which is mostly unsung in communities and other Dynamics blog posts
If you maintain the same customer/vendor masters in multiple legal entities and must perform tedious tasks to copy customers/vendors details between legal entities, this is the solution for you. For this blog I will be using customer record to show case copy functionality of D365 F&O.
Configuration and cautions:
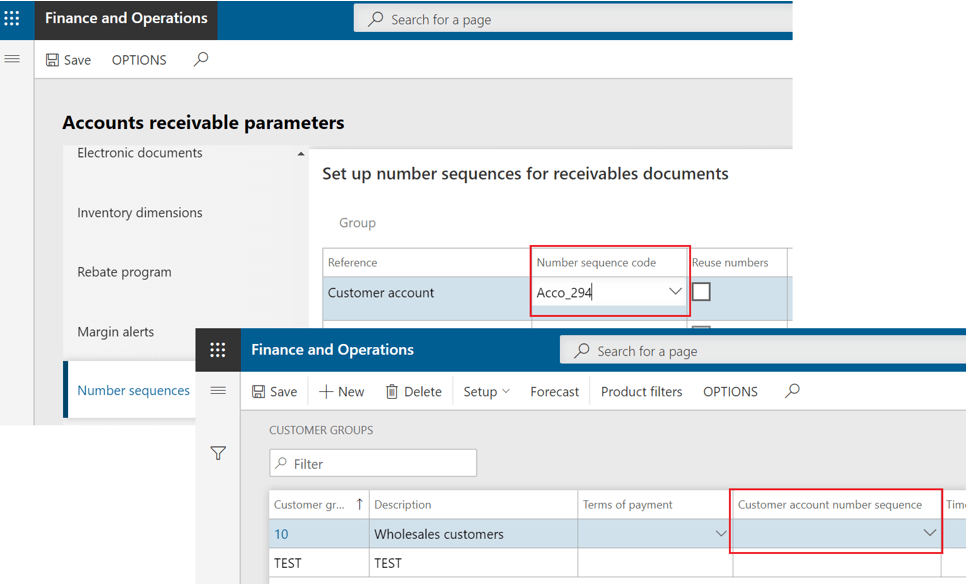
The number sequence for customer id should be shared for copying the customer record between the legal entities and it uses the same customer id’s in both the legal entities.
Customers can be copied with manual customer IDs. However, if you try to copy a customer to a legal entity where the customer ID already exists, the copy process won’t be started.
What it means a shared number sequence? A number sequence should have scope parameter as shared in the number sequence master record.

The customer number sequence can be assigned to accounts receivable parameters and customer group setup. The number sequence for a customer group is used first. If no number sequence is specified for a customer group, the number sequence that is specified on the Accounts receivable parameters page is used.
Accounts receivable > Accounts receivable parameters > Number sequence tab
and
Accounts receivable > Setup > Customer groups
Now let’s see how the copy functionality works, there are two way in which copy functionality is designed.
Copy from Name field.
On the all customer list of company where customer should be copied, Click new
On the Name field, click on the drop down and search for customer
Click on the roles and you can copy a party only if it has a customer role, and if it has that role in a legal entity that isn’t the current legal entity
Scroll down to see the copy customer option, click on yes and select the company from which you wish to copy the customer
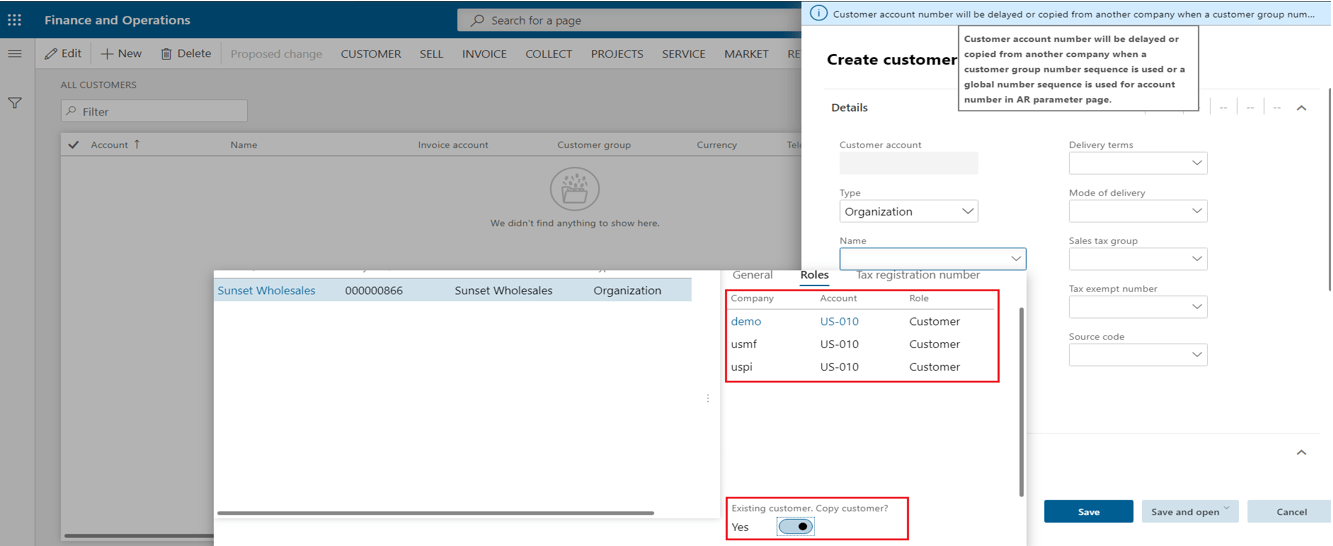
Click on Select
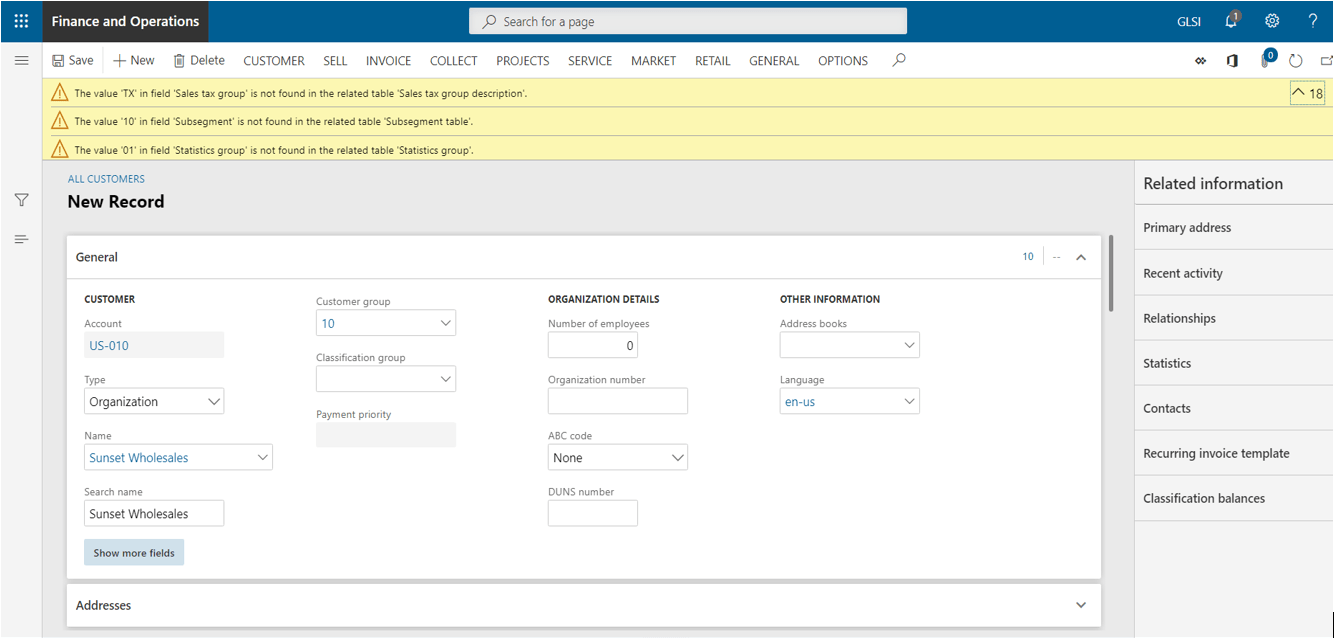
And there will be validation check for all the required information in current legal to be copied from other legal entity. The copy of the customer can’t be saved until all the validation errors are fixed.
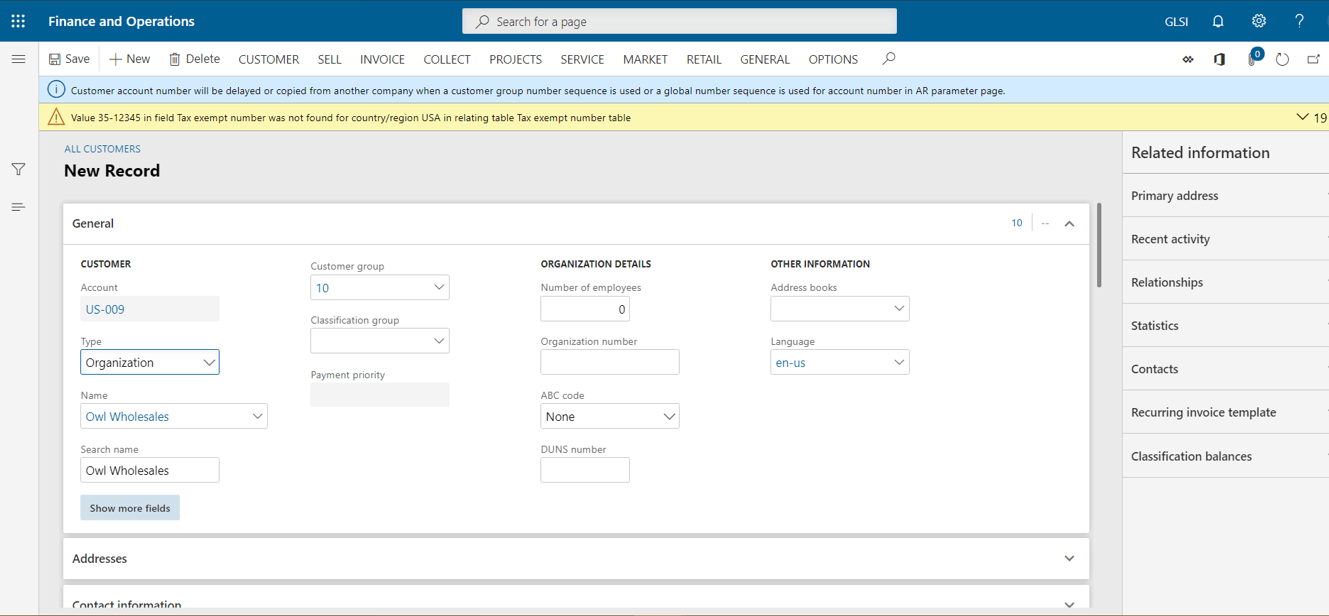
Copy from tax exempt number search feature
Customer copy can be also performed using tax exempt number search feature. that is in the Registration group on the Customer tab on the Action Pane of the All customers page.
And copy customer option appears when you select tax exempt record of a customer from different legal entity which does not exist in currency legal entity.

Click on copy customer to copy the record and same validation occurs which should be fixed until the customer record can be saved in current legal entity.
Important note:
The same functionality is available in Accounts payable to copy vendors between legal entities.
Disclaimer:
The data used for this demonstration is from Contoso demo data in D365 F&O application and it does not contain or imply of any individual or company data.
Best Regards,
Namith Hosmane
Disclaimer:
This is a personal blog. Any views or opinions represented in this blog are personal and belong solely to the blog owner and do not represent those of people, institutions or organizations that the owner may or may not be associated with in professional or personal capacity, unless explicitly stated. All content provided on this blog is for informational purposes only. This blog makes no representations as to the accuracy or completeness of any information on this site. -
Duplicate expenses are a persistent issue for companies. Submitting the same expense twice is one of the most common errors employees make. In most cases, duplicate expense submissions are honest mistakes. However, occasionally, they are attempts to commit expense fraud. It is important for any organization to detect such expenses, audit, find proofs and take the necessary actions as deemed to companies’ rules and regulations with the use of technology that can be more efficient.
In D365 F&O, we can configure audit policies to detect the potential duplicate expense reports, please find the details below to configure.
Setup case category
Before starting to create any cases in D365 F&O Case categories are mandatory to group similar cases and store information about knowledge articles that are related to cases.
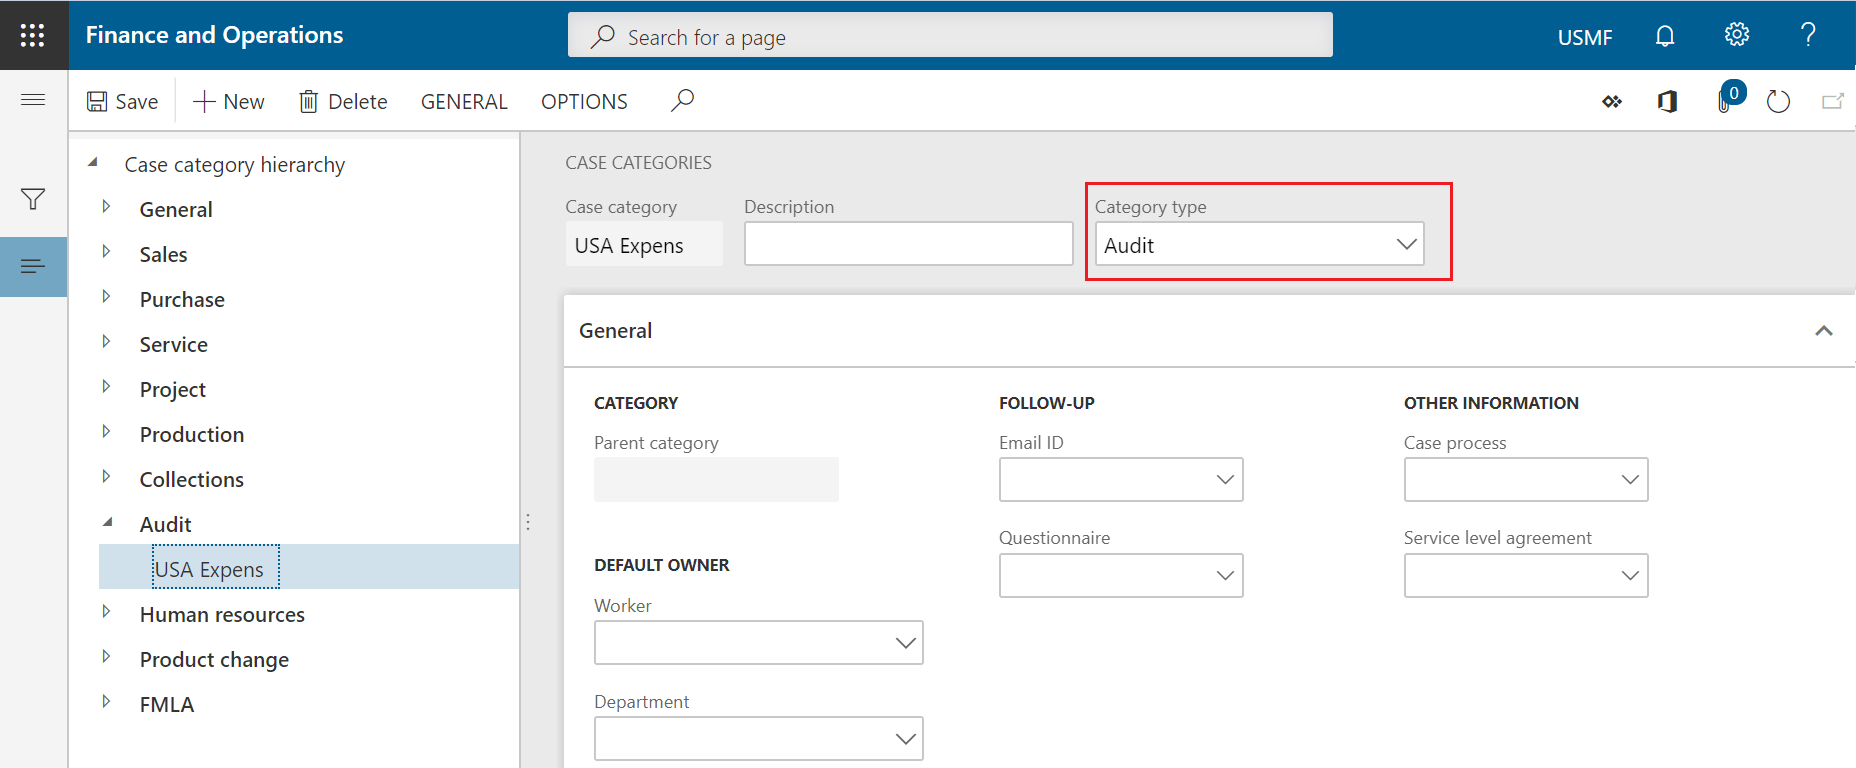
A new case category will be created with category type ‘Audit’ which will used when case gets automatically created after detecting the duplicate expense report, please see below for further details
- Organization administration > Setup > Cases > Case categories
- Click New > Add case category and Category type ‘Audit’
Configure audit rule types and policies
Setup Audit rule type:
The policy rule type specifies the Application Object Tree (AOT) query to use as the starting point for creating the policy rule. It also specifies the query type to use for the policy rule. This is to Evaluate source documents to determine whether they contain duplicate entries in specified fields.
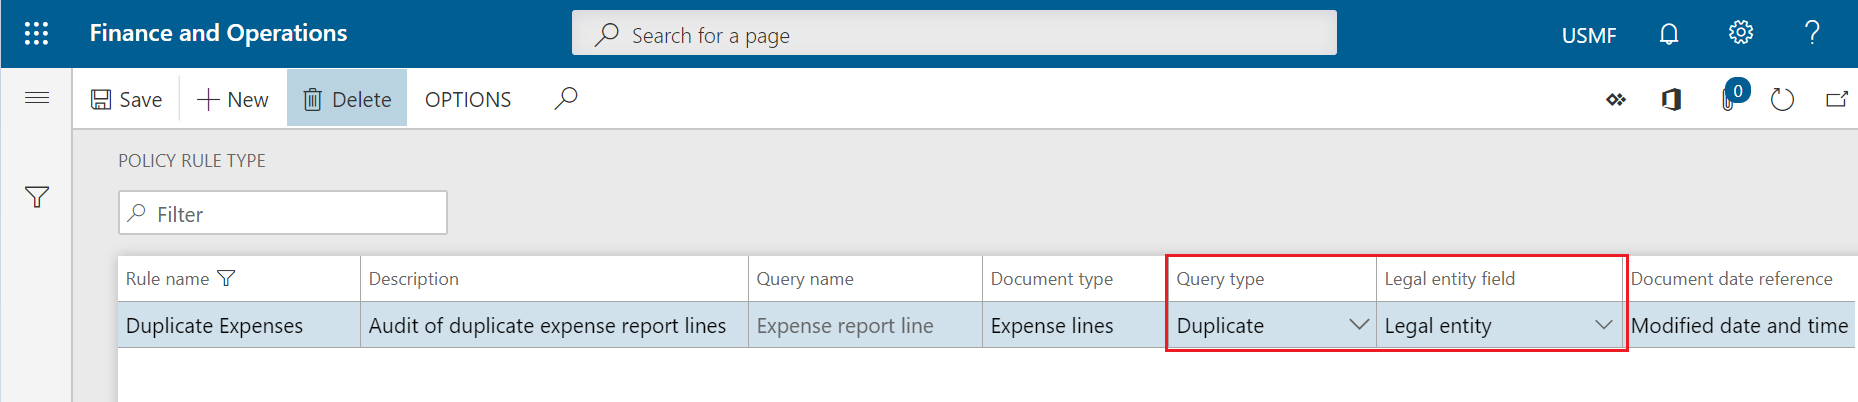
- Audit workbench > Setup > Policy rule type
- Click new, enter rule name and description
- Enter query name, there is option here to select expense header, line or both. Depending on the requirement this can be configured.
- Select the query type as duplicate and legal entity field as legal entity
Setup Audit policies:
- Now setup the audit policy for the duplicate expense report
- Audit workbench > Setup > Audit policies
- Click on parameters
- On the policy rule parameters, Select Companies as Order of precedence’s. This is required to setup the policy precedence rule. The applicable policies will be determined based on the first organization types selected.
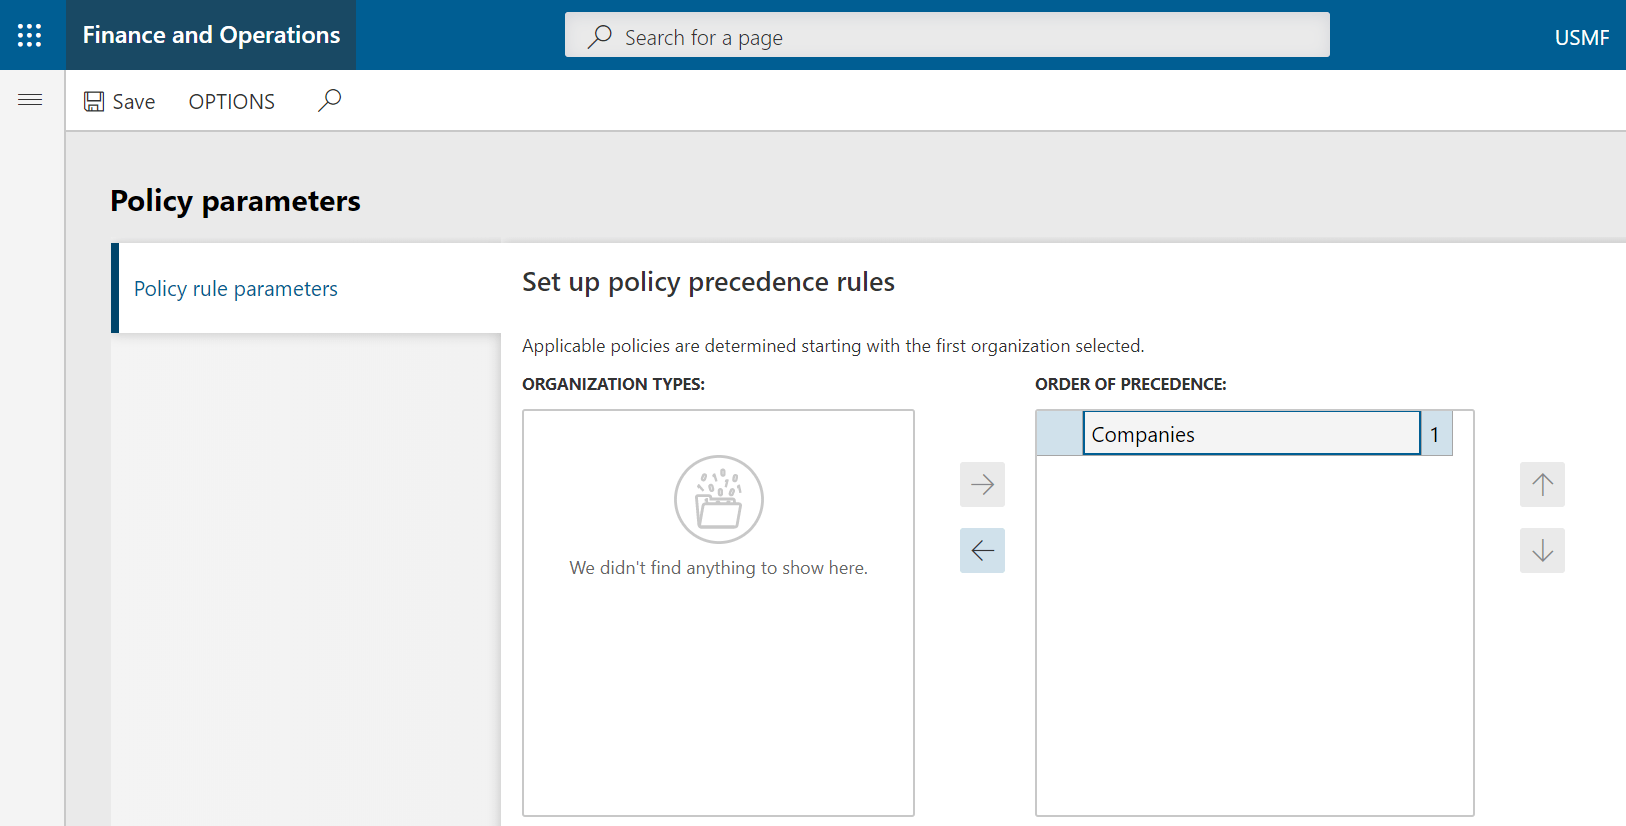
- Close the Policy parameter form
- Click new
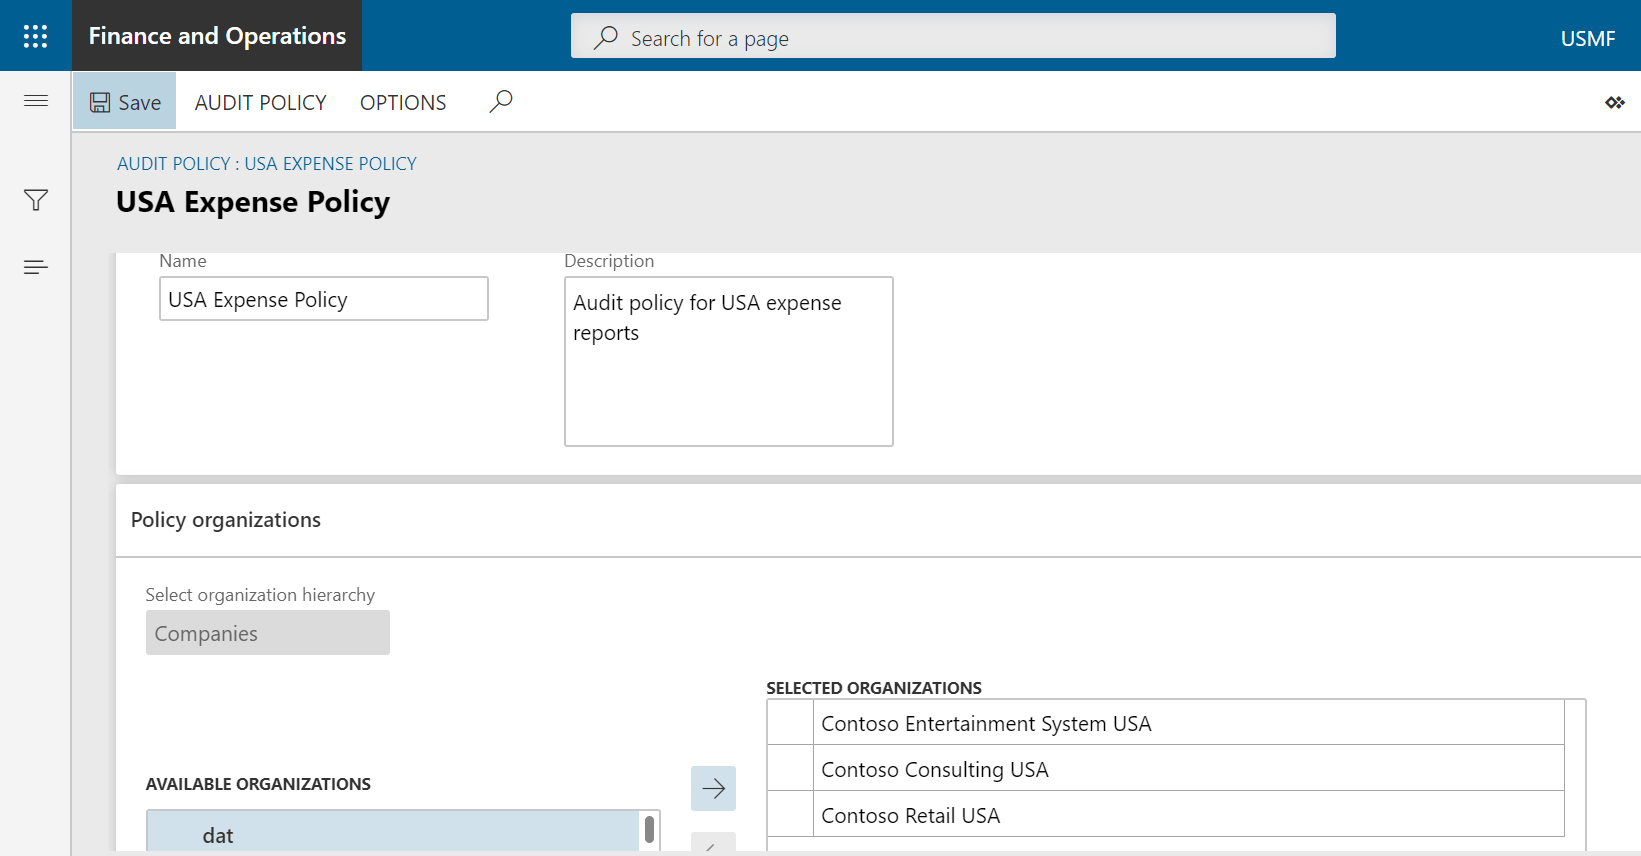
- On the General fast tab, add policy name and description
- On the policy organization fast tab, Select the all the companies to which this policy rule will be applicable
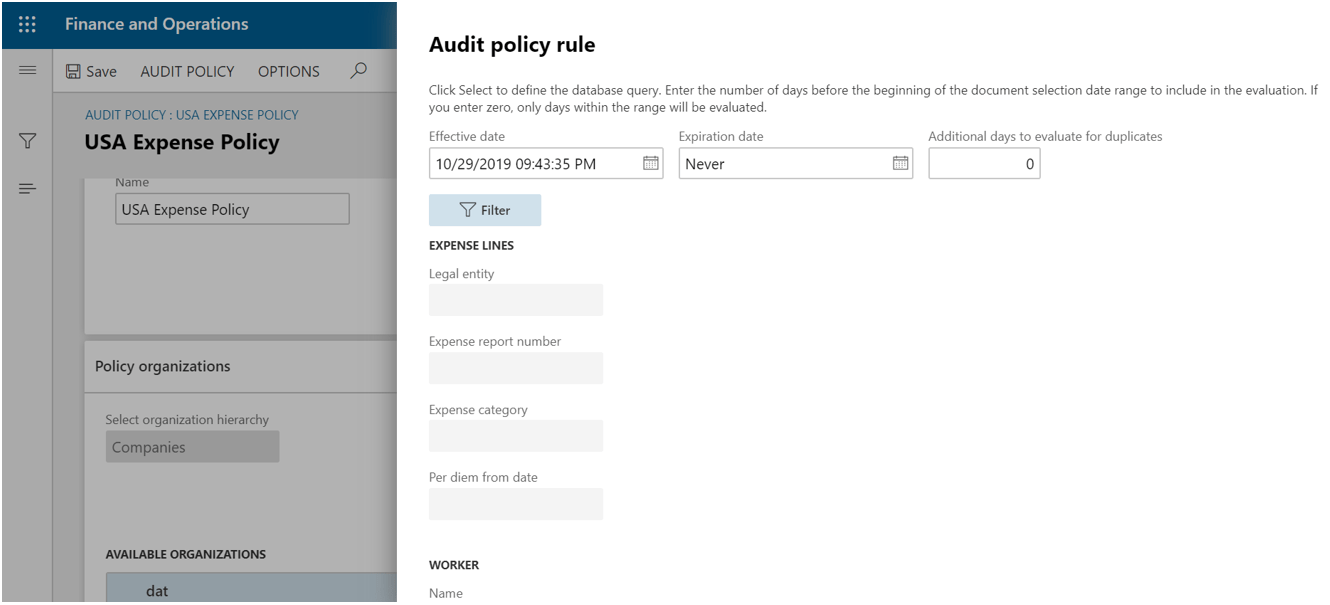
- On the policy rule fast tab, click on the Duplicate rule type and click on create policy rule type
- Click on filter, on the Group by section, select the table and field to which duplication of the record should be identified

- Click ok and Enter the Effective date and Expiration date of the policy rule
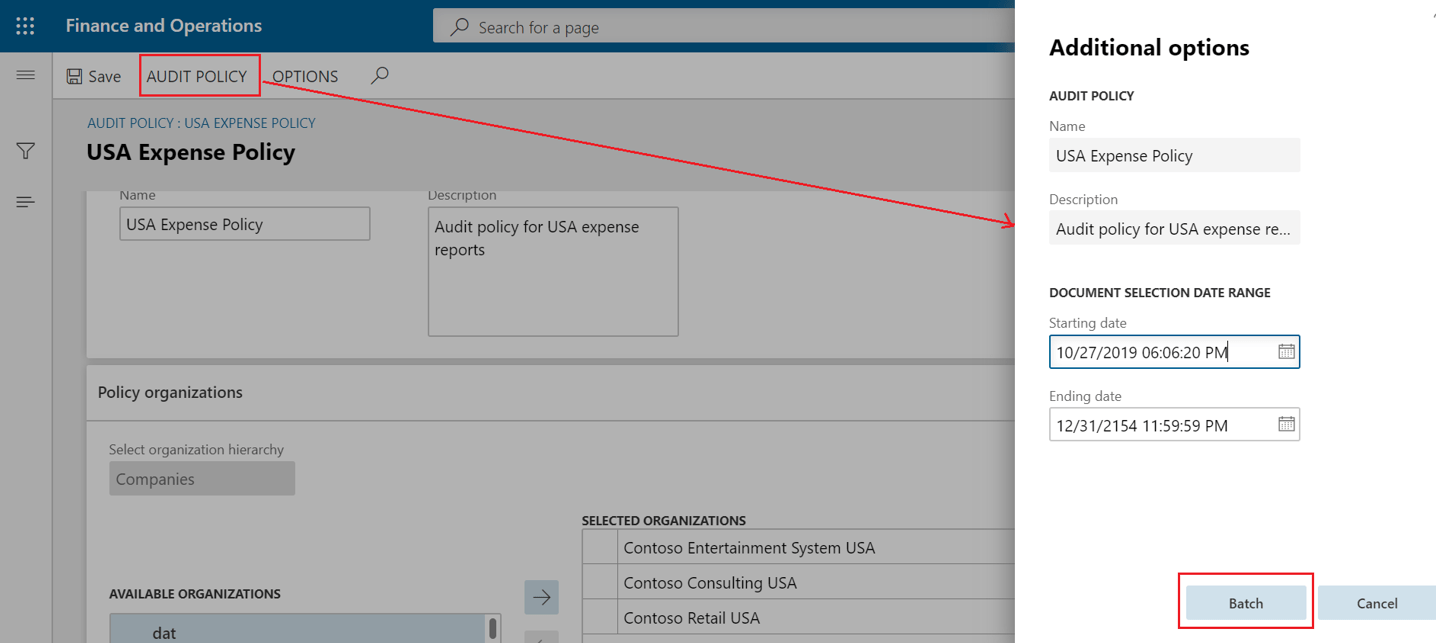
Setup audit policy batch job:
After the policy rule has been setup, Click on the Audit policy on the action pane and Additional options
From here audit policy rule batch job can be configured to look for potential duplicate expense reports entered by employees
See how it works
As the batch job keeps running based on the recurrence, it checks for potential duplicate expenses reports based on the policy setup.
I created and posted a duplicate expense report as below,
- Employee: <XYZ>
- Expense category: Car rental
- Amount: $122
- Date: 10/01/2019

As the audit policy rule jobs gets executed, an audit case will be created in Audit workbench automatically
- Audit workbench > Audit cases
- On the association fast tab, you would see the details of the duplicate expense report created which will used by the compliance team to investigate and take the necessary action on it.

Similarly, audit rules can be configured for duplicate vendor invoice entry, sample audit of purchase orders, audit for out of pocket expenses and much more.
Disclaimer:
The data used for this demonstration is from Contoso demo data in D365 F&O application and it does not contain or imply of any individual or company data.
This is a personal blog. Any views or opinions represented in this blog are personal and belong solely to the blog owner and do not represent those of people, institutions or organizations that the owner may or may not be associated with in professional or personal capacity, unless explicitly stated. All content provided on this blog is for informational purposes only. This blog makes no representations as to the accuracy or completeness of any information on this site.
-
Microsoft in the recent months has released some very useful finance features for D365 finance application which has been blogged by some of the Microsoft Dynamics enthusiasts around the world. Microsoft themselves has released docs to cover the feature’s briefly.
In this blog, I am summarizing some of the key features released by Microsoft recently with reference links for all those who wants to learn and understand about these new features.
Dual currency:
‘Dual currency’ concept is track all sub-ledger transactions in reporting currency, this has given the real purpose to the reporting currency by not just being used for general ledger reporting but also at sub-ledger level for reporting and other functionalities. Microsoft termed reporting currency as ‘Secondary accounting currency’.
Microsoft has continued to enhance dual currency features with recently released feature to control dual currency consolidations
Below are some of the useful links to know more about these functionalities,
Topic References Dual currency influence on other modules https://namithhosmane.blog/2018/10/17/what-you-should-know-about-dual-currency/ https://docs.microsoft.com/en-us/dynamics365/finance/general-ledger/dual-currency#module-changes
Posting process change https://docs.microsoft.com/en-us/dynamics365/finance/general-ledger/dual-currency#posting-process Dual currency consolidations https://docs.microsoft.com/en-us/dynamics365-release-plan/2019wave2/finance-operations/select-consolidation-amount-control-consolidate-online-dual-currency-consolidation Settle remainder:
Settle remainder is one of the key enhancements from Microsoft in recent releases, this functionality provides an ability to set the defaults to create the journal entry for remaining open transactions balance and settle them. It is usual business scenario that customer short pays on invoices where outstanding balances will be written off or the remaining transaction balance will be moved to different customer account.
Please refer to below link to understand more on this functionality.
Topic References Settle remainder feature details https://docs.microsoft.com/en-us/dynamics365/finance/cash-bank-management/settle-remainder Bank Foreign currency revaluation:
Bank foreign currency revaluation is most requested functionality from old versions of Dynamics, previously this functionality was enabled for Russia due to local requirement and most of the customer had to do modifications to enable the feature outside Russia. However, Microsoft has now made it part of standard D365 finance app.
With this user do not need to re-valuate the bank ledger account directly which creates mismatch between the bank ledger account total and sub-ledger account total. This feature also has capability to run the revaluation across all legal entities from a single screen.
Please refer to below link to understand more on this functionality.
Topic References Bank foreign currency feature details https://docs.microsoft.com/en-us/dynamics365/finance/cash-bank-management/bank-revaluation Expense reports re-imagined
Microsoft has enhanced the expense management module to simplify the process of completing expense reports and decrease the time that is required, this helps users to be productive by focusing on key day to day activities.
This functionality can be enabled in feature management to add a new setup form to configure expense fields visibility to determine what data is required, optional, or not enabled for entering expense reports. A new expense workspace is enabled with this feature, replacing the previous expense workspace and is the landing page for the improved entry experience.
Topic References Expense reports enhancement details https://docs.microsoft.com/en-us/dynamics365/finance/expense-management/expenseworkspacenew Revenue Recognition:
Revenue recognition is one of the most awaited features from Microsoft released in Wave 2. This feature provides an ability to perform revenue recognition on sales orders and time and materials projects to fulfill US Generally Accepted Accounting Principles (GAAP) and International Financial Reporting Standards (IFRS) requirements.
Please read the below articles to understand more on this space,
Topic References Revenue recognition feature overview and demo video https://docs.microsoft.com/en-us/dynamics365-release-plan/2019wave2/finance-operations/revenue-recognition https://www.youtube.com/watch?v=lMxQhCqof3c&feature=youtu.be&t=18 (Refer first 3 minutes of the video)
Revenue recognition setup https://docs.microsoft.com/en-us/dynamics365/finance/accounts-receivable/revenue-recognition-setup Recognize deferred revenue https://docs.microsoft.com/en-us/dynamics365/finance/accounts-receivable/revenue-recognition-recognize-deferred-revenue Revenue recognitions on sales orders https://docs.microsoft.com/en-us/dynamics365/finance/accounts-receivable/revenue-recognition-so-basics Feature management:
This is not a finance feature but wanted to discuss on this because new features added in every release will be now controlled through feature management workspace where it lists all the feature to enable and view the documentation on new feature. Most of the above features discussed in this blog are controlled through feature management.
Please refer the below articles for more information on feature management
Topic References Feature management overview https://docs.microsoft.com/en-us/dynamics365/fin-ops-core/fin-ops/get-started/feature-management/feature-management-overview Feature management feature details https://msdynamics.net/d365-updates/d365-finance-operations-feature-management/ Hope this helps!
Best regards,
Namith Hosmane
-

Many of us still wonder why ledger settlements functionality is used and the valid business scenario? What is newly introduced advance ledger settlement functionality? And wonder why Microsoft has been investing in enhancing the ledger settlement feature and what’s coming next?
Have a read through the below article to witness the answers for all the above questions.
Business Scenario:
Sometimes when a payment is received you cannot identify which invoice the customer wants paid or which customer made the payment, in such situations the payment will be kept on hold to debit the cash/bank account and credit the suspense account until the customer is identified. When the customer is identified who made the payment, the suspense account will debit and Account Receivable customer account will credit. This closes out the suspense account and the payments are posted to the correct customer account.
Similarly, there is many such use cases where suspense and temporary accounts are used in daily business transactions.
Why ledger settlements:
Ledger settlements is used to settle such suspense debit and credit entries in the system of a ledger account. This activity is generally performed by accountants periodically to reconcile and analyze temporary accounts to verify if there are still open-ended transaction which needs to reclassed and rectified.
In case a suspense or temporary accounts are not closed at the end of an accounting period, the balance in suspense account is shown on the balance sheet which may result in inaccurate financial reporting and hence it is important to identify and correct the transactions periodically in the system.
From the above business scenario, let’s say payment is recorded to suspense account during start of the month and the customer was not identified until the month end. The ledger settlements will help find all such transactions to perform research and close open-ended transactions in the system.
Traditional ledger settlements:
Since AX 2009, traditional ledger settlements have very basic functionality to settle ledger transactions manually through ‘Ledger settlement’ form in general ledger
Where you mark two transactions manually and include them in the lower grid and click on accept to settle the entries from the action pane.

Advance ledger settlements:
Advance ledger settlement now provides additional capabilities for filtering transactions which make it easier to find transactions to be settled with reversal functionality on the same form.
To enable advance ledger settlements, follow the steps below
General ledger > Ledger setup > General ledger parameters
On the Ledger settlements tab, Set Advance ledger settlement option to ‘Yes’
Also, the list of accounts used for ledger settlements should be configured in this form and the list will be used to filter transaction in ledger settlement page.

Once the advanced ledger settlement feature is enabled in general ledger parameters, we will now see the advanced layout of ledger settlement form with additional capabilities to filter and search transactions for settlement
General ledger > Periodic > Ledger settlements
This form provides an ability to filter transactions by date range, date intervals, posting layer and, financial dimension set.
Then clicking the display transactions will show all transactions based on the filter criteria and ledger accounts configured for ledger settlements

Select the ledger transactions to be settled and mark them, as more number of transactions are marked for settlement it can be further filtered to Show all, marked and unmarked

Once all the transactions are marked, it can be settled using ‘Settle marked transactions’ button in the action pane. Then enter the date of settlement to be considered for settlement.
Note : The sum of marked transactions should always be zero to settle the transaction

Now the Status filter can be used to view all the settled transactions

The advance ledger settlement also has the capability to reverse the settled transaction from the same form
Mark all the settled transactions to be reversed, then click on the ‘Reverse marked transactions’ button in the action pane.
Note: Once the reversal of settled transactions is successfully completed, the status of the transaction will be reverted back to ‘Not settled’

If additional ledger accounts need to be added for ledger settlement no need to go back to general ledger parameters, the same form has an ability to add more ledger accounts.

Finally, there is a standard report which provides list of all ledger transactions which are not settled for business team to verify/analyze and take the corrective actions where required.
General ledger > Periodic > Unsettled transactions report

I would like to end this post saying there is definitely scope for automating on this process with pre-defined settlement rules and I hope Microsoft will consider doing it in the future.
Disclaimer:
This is a personal blog. Any views or opinions represented in this blog are personal and belong solely to the blog owner and do not represent those of people, institutions or organizations that the owner may or may not be associated with in professional or personal capacity, unless explicitly stated. All content provided on this blog is for informational purposes only. This blog makes no representations as to the accuracy or completeness of any information on this site.
